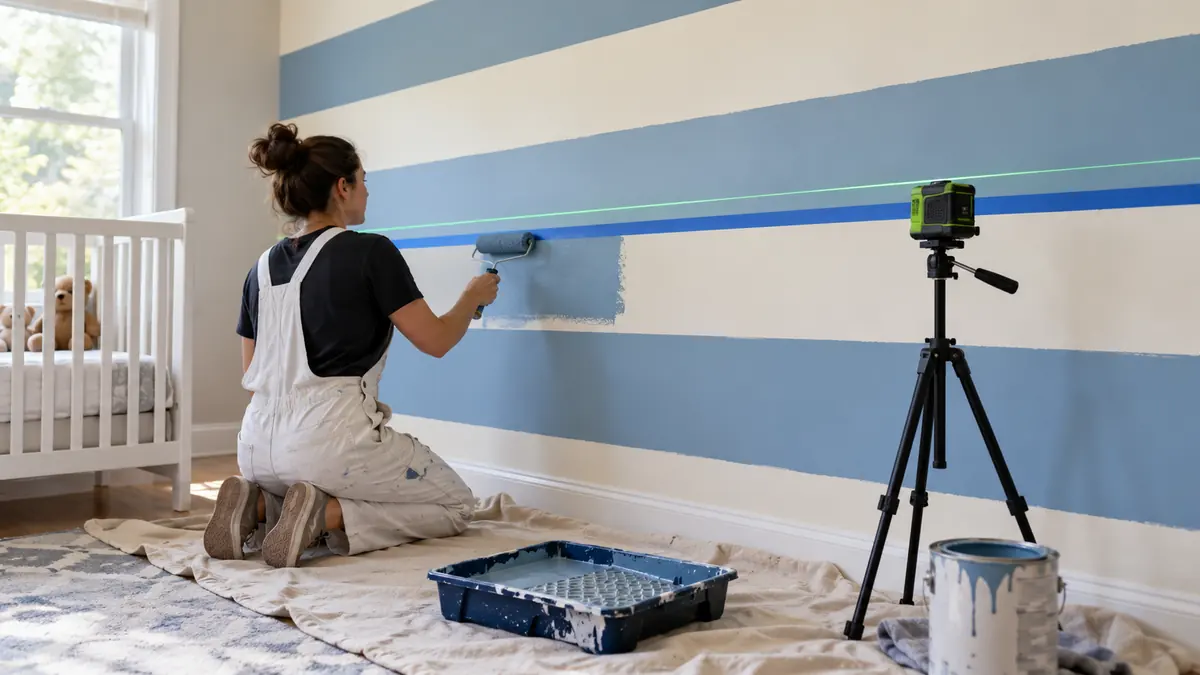
The tape looks straight up close. Then you step back, and the stripe seems to climb toward the corner. A projected reference helps you see the intended direction before the paint makes the layout permanent, especially across a long wall. The best laser level for painting stripes should make the intended pattern easy to mark while distinguishing level lines from deliberate angles.
Horizontal, vertical, and deliberately diagonal stripes need different setup choices. Automatic leveling provides gravity-based references. A supported manual angle mode fixes a projection in another orientation, while a vial-guided wall tool needs careful manual positioning from the start.
These nine choices cover automatic crosses, continuous horizontal coverage, and compact manual surface guides. Pick according to the stripe layout, mounting method, and amount of wall the reference must reach. The beam guides the layout; the tape edge and paint finish still need their own care.
Quick Answer
- Best Overall: Fanttik D2. Green horizontal and vertical cross lines.
- Best Brightness-Control Cross: Motovera LL-T2. Green horizontal and vertical cross lines.
- Best Simple Red Cross: RockSeed Red Cross-Line Laser. Red horizontal and vertical cross lines.
Comparison Table
| Product | Best fit | Reference layout | Power and positioning |
|---|---|---|---|
| Fanttik D2 | Best Overall | Green horizontal and vertical cross lines | Integrated 2200mAh rechargeable battery; USB-C; Magnetic rotating bracket |
| Motovera LL-T2 | Best Brightness-Control Cross | Green horizontal and vertical cross lines | AA battery supply; Adjustable magnetic bracket |
| RockSeed Red Cross-Line Laser | Best Simple Red Cross | Red horizontal and vertical cross lines | Battery-powered selected package; Rotatable compact housing |
| Huepar M-9011G | Best Compact AA Alternative | Green horizontal and vertical cross lines | AA battery supply; Magnetic pivoting base |
| Bosch GLL50-40G | Best for Stripes Continuing Around a Room | Green 360° horizontal plus vertical line | Four AA batteries; LB10 bracket and DK10 ceiling clip |
| Huepar B03CG Pro | Best Connected Multi-Surface Layout | Three green 360° planes | Removable rechargeable battery; Magnetic pivoting base |
| PREXISO PLV2 Multi Surface Laser | Best Manual Perpendicular Surface Guides | Perpendicular surface references; manual vials | Two AA batteries; Pin or adhesive wall base |
| BLACK+DECKER BDL220S | Best Simple Manual Wall Tool | Single surface line; manual alignment | Two AA batteries; Rotating wall attachment |
| SKIL LL932201 | Best Rechargeable Horizontal-Plane Package | Red 360° horizontal plus vertical line | Integrated rechargeable battery; Included adjustable tripod |
1. Fanttik D2 (Best Overall)

A decorating design can move between horizontal, upright, and deliberately diagonal guides. The D2 provides automatic and supported manual references in a compact rechargeable body. Its local cross can keep those different layout intentions manageable without a larger full-plane setup.
The D2 is a pocket-format green cross-line laser with automatic and manual modes. The selected package includes a magnetic bracket, USB-C cable, and drawstring pouch. An out-of-level flashing signal identifies when the automatic leveling range is exceeded; the bracket rotates for positioning rather than projecting a continuous plane. USB-C charging is convenient when the tool is prepared before the furniture is moved and the painting area is covered. Its rotating bracket changes direction but does not produce a full horizontal plane. For several walls, preserve control marks and reconnect the setup rather than assuming a turned instrument retains the first reference.
Pros
- Pocket-format housing.
- Green cross-line reference.
- USB-C charging.
- Magnetic bracket included.
- Out-of-level indication.
Cons
- Battery is integrated.
- Rotating the bracket does not provide a projected 360° plane.
The D2 is a good fit for a decorating tool that moves between simple horizontal, upright, and deliberately angled references. Its compact size and USB-C routine suit preparation before the room fills with tape and coverings. A common height around several walls gives the GLL50-40G a stronger purpose. For one local design, the Fanttik provides useful automatic and supported manual options, with the intended direction established first so a straight-looking projection is never mistaken for the wrong kind of reference.
To buy this product, click here.
2. Motovera LL-T2 (Best Brightness-Control Cross)

Wall color and changing daylight can make brightness adjustment useful during marking. Motovera supplies four settings with its local green cross. Its magnetic base offers a positioning route on suitable steel while the instrument stays off the wall surface being decorated.
The LL-T2 uses green cross lines with four selectable brightness settings. The listing describes a magnetic fine-adjustment bracket and a 1/4-20 tripod interface. Self-leveling and locked manual modes serve different layouts; its rotating mount does not make it a rotary grading laser. Its automatic and manual modes serve different layout intentions. Use automatic leveling for a gravity-based horizontal or upright stripe, and establish a deliberate manual angle from the design when needed. A brighter line does not choose the tape edge or remove the need for consistent marking along the projection’s center.
Pros
- Green horizontal and vertical references.
- Four brightness settings.
- Self-leveling and manual modes.
- Magnetic positioning bracket.
- Standard tripod interface.
Cons
- Not a rotary elevation laser despite some listing terminology.
- Bundle contents should be checked for the selected variant.
The Motovera is most attractive when controllable brightness makes the guide clearer on the actual wall finish. That benefit should be visible at the working surface rather than assumed from the setting count. A continuous horizontal design may call for a plane tool, while a local cross can already cover a single-wall pattern. For the latter, the Motovera offers a practical arrangement when its support stays outside the painting path and the chosen reference can be followed consistently along the tape layout.
To buy this product, click here.
3. RockSeed Red Cross-Line Laser (Best Simple Red Cross)

A local stripe pattern can be served by a simple red cross in suitable indoor light. The RockSeed provides automatic leveling and a documented locked manual mode. Those operations suit different design directions, making the intended reference more important than adding unused planes.
This selected RockSeed version projects red horizontal and vertical references. It offers automatic leveling and a locked manual mode for deliberate angled lines. The package identifies batteries and a carrying pouch; a suitable support should be arranged for the intended working height. The important step is deciding which reference belongs to the design before laying tape. A diagonal stripe should not be called level simply because the line is straight. Preserve a pair of appropriate control marks for the intended angle so the setup can be checked again if the tool or support moves.
Pros
- Red cross-line projection.
- Self-leveling operation.
- Manual angled-reference mode.
- Batteries included in the selected package.
- Carrying pouch included.
Cons
- Not a continuous-plane laser.
- Do not assume an elevated stand is included.
The RockSeed suits a nearby decorating layout in which the red cross remains clear and the automatic or documented manual mode matches the design. It does not need to surround the room with projection to serve that task. For a border across several walls, the continuous-plane options change the setup more meaningfully. On one wall, this focused cross makes sense for a buyer who wants the intended line visible while keeping the support and preserved angle or height marks straightforward.
To buy this product, click here.
4. Huepar M-9011G (Best Compact AA Alternative)

A visibly readable indoor wall is a natural setting for a compact AA-powered cross. The M-9011G supplies automatic and manual operation for different layouts. It can keep the nearby guide straightforward when continuous projection and detector operation are not part of the painting task.
This compact Huepar model projects horizontal and vertical green lines rather than full-room planes. The published product information describes self-leveling and locked manual operation with a magnetic pivoting base. It is an indoor-focused cross-line option; do not assume that another Huepar model’s receiver capability applies. Keep the mode clear when moving between horizontal and diagonal designs. Automatic leveling is useful only within its supported range and status indication. The manual projection needs the intended angle established independently. This model also has no receiver support, so choose it for a visibly readable indoor setup.
Pros
- Green horizontal and vertical references.
- Compact cross-line arrangement.
- Self-leveling operation.
- Manual mode for intentional angles.
- Magnetic pivoting positioning base.
Cons
- No continuous 360° horizontal plane.
- Receiver compatibility must not be assumed.
The M9011G is a useful compact option for visibly readable indoor stripes and an AA-powered preparation routine. Its manual mode can serve a deliberate angle, while automatic leveling serves level and plumb references. The distinction needs to stay clear as the design changes. A buyer planning outdoor detector work should look elsewhere. For a local decorating session, however, the Huepar can provide exactly the cross needed, without making a larger plane or remote-control system part of every mark.
To buy this product, click here.
5. Bosch GLL50-40G (Best for Stripes Continuing Around a Room)

A border at one height across several walls gives continuous projection a clear purpose. The GLL50-40G supplies that horizontal reference with a vertical line available locally. Its geometry is useful when the repeated height, rather than an angled pattern, does most of the marking work.
The GLL50-40G combines one continuous horizontal plane with a vertical line. The specified package includes four AA batteries, an LB10 bracket, a DK10 ceiling clip, and hard case. Bosch describes an IP64 housing, recessed windows, and pendulum transport lock. Position it where the plane clears furniture, coverings, and your working position. The room’s corners can still interrupt the beam, so retain control marks before changing the setup. Choose this model for the continuous level-reference role rather than assuming a transport lock creates every possible decorative angle mode.
Pros
- Continuous horizontal reference.
- Vertical alignment line.
- AA power avoids a proprietary charger.
- Bracket and ceiling clip supplied.
- Hard case and pendulum lock.
Cons
- Not a three-plane square-layout system.
- No rechargeable pack included in this configuration.
The GLL50-40G has its strongest painting role when a border or horizontal stripe must continue at one height across the room. Its complete horizontal reference addresses that repetitive task, with the vertical line available locally. A deliberate diagonal pattern calls for a different supported mode or tool arrangement. For the shared-height design, the Bosch offers a useful reason to favor continuous coverage, especially when control marks preserve the reference through corners or a later move of the instrument.
To buy this product, click here.
6. Huepar B03CG Pro (Best Connected Multi-Surface Layout)

A connected geometric paint design can need more reference directions than one isolated stripe. The B03CG Pro provides selectable planes for those related surfaces. Its removable supply and supported manual operation offer another working arrangement, with the intended design established independently of the projected grid.
One horizontal and two vertical planes can be selected in different combinations. The listed package contains a removable 5,200mAh battery, USB-C charging equipment, magnetic base, target, and hard case. Receiver operation requires an appropriate Huepar receiver, which is separate from this kit. Keep the active references selective so the tape line does not get lost in a busy projection. Its supported manual operation can provide an angled guide, but the intended geometry still comes from the design and preserved marks. The removable battery is useful when a layout session runs longer than first expected.
Pros
- Three full planes cover adjoining surfaces.
- Selectable beam combinations avoid unnecessary lines.
- Removable rechargeable battery supports repeated indoor projects.
- Magnetic base provides positioning on suitable steel.
- Hard case and charging equipment are included.
Cons
- Full-height positioning tripod is not included.
- Outdoor receiver must be supplied separately.
The B03CG Pro is easier to justify when the paint design relates several surfaces or belongs to a broader room renovation. Three planes can keep the connected geometry available while unnecessary directions are switched off. One small stripe rarely needs all of it. For a buyer who will use those relationships elsewhere, the removable supply and selectable planes give the Huepar useful scope, with the design marks controlling the layout rather than every visible intersection becoming another line to follow.
To buy this product, click here.
7. PREXISO PLV2 Multi Surface Laser (Best Manual Perpendicular Surface Guides)
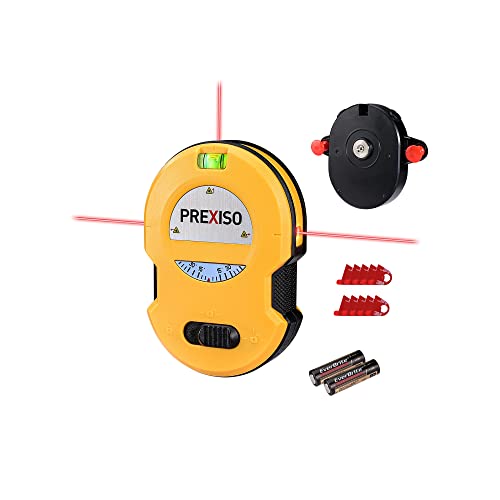
Keeping perpendicular guides beside the wall creates a different setup from automatic projection on a stand. The PLV2 uses manual alignment, illuminated vials, and surface attachment options. That format can be useful where the guide needs to remain close to the tape layout.
The PLV2 uses surface-projected perpendicular references and bubble-vial alignment. Its illuminated angle dial provides a reference for deliberately angled layouts. The mounting base offers pin and adhesive-strip options; surface suitability still needs checking. The attraction is keeping the guide beside the surface where tape is being positioned. The trade-off is the alignment step and the attachment method. Pins can mark the wall, and adhesive suitability depends on the finish. Test the appropriate fixing route and align the vials deliberately before trusting the projection.
Pros
- Perpendicular surface-layout references.
- Illuminated vials aid manual alignment.
- Angle dial for deliberate direction changes.
- Pin and adhesive mounting options.
- Compact wall-mounted arrangement.
Cons
- Does not automatically compensate for tilt.
- Adhesive and pin mounting have surface-specific limits.
The PLV2 is a different proposition from an automatic tool on a stand: its guide stays close to the surface, with manual alignment and wall attachment as part of the routine. That can be useful beside a local taped design when the chosen fixing method suits the finish. Someone repeating many level or plumb marks may prefer an automatic cross. For controlled surface work, the PREXISO has a clear purpose, provided the vials and intended guide are established before the tape starts to follow them.
To buy this product, click here.
8. BLACK+DECKER BDL220S (Best Simple Manual Wall Tool)

A small manual wall tool has a defined place in a carefully established local paint layout. The BDL220S supplies bubble-guided alignment and a rotating wall attachment. Its useful role depends on a suitable fixing method and a deliberately set direction, rather than automatic compensation.
Backlit horizontal and vertical vials provide the alignment reference. The operating manual instructs the user to rotate the device to center the bubble, despite self-leveling language in some listings. The wall attachment uses a drywall pin, and its rotation does not create a 360° projected plane. The rotating attachment does not cast a horizontal plane around the room or remove the manual leveling step. Check the guide against the intended design before laying a full run of tape. If a pin attachment is used, account for the resulting small wall mark as part of the decorating preparation.
Pros
- Rotating attachment permits angled wall references.
- Angle-reference ring assists deliberate layouts.
- Backlit vials aid manual setup.
- Wall attachment and AA batteries included.
- Wall-mounted working position keeps the tool near the marks.
Cons
- Manual bubble alignment is required.
- Drywall-pin mounting makes a hole.
The BDL220S fits a small wall layout where manual bubble alignment and the attachment method are acceptable parts of the preparation. Its rotating wall connection can orient the guide, but it does not create a room-wide plane or automatically level the tool. A buyer wanting repeated automatic references has a stronger reason to consider the Fanttik or another cross. For a nearby deliberate guide, the BLACK+DECKER can remain a useful decorating tool without being asked to perform a different optical job.
To buy this product, click here.
9. SKIL LL932201 (Best Rechargeable Horizontal-Plane Package)
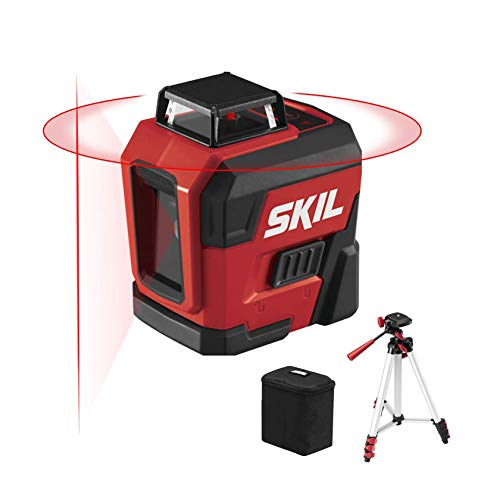
A rechargeable horizontal plane and compact stand can form a useful border-marking package. The SKIL LL932201 combines those parts with a local vertical line. It is relevant when a common height must continue across surfaces and the included support reaches the intended reference.
The laser projects one continuous horizontal plane and a vertical reference line. The included tripod reaches approximately 3½ feet; charging is by micro-USB. SKIL specifies ±3/16 inch at 30 feet and provides a locking mode for intentional angled lines. Check that the stand places the reference at the intended height without an unstable improvised support. The integrated rechargeable battery and micro-USB port also need preparation before the painting session. Choose it for a clear level datum, and use only the tool’s documented modes for any other projection direction.
Pros
- Continuous horizontal reference around the room.
- Vertical line adds a second reference direction.
- Adjustable tripod included.
- Integrated rechargeable battery.
- Manual mode supports intentionally angled layouts.
Cons
- Included tripod has limited maximum height.
- Micro-USB charging requires the matching cable.
The SKIL package is appealing for a shared horizontal stripe height when the included tripod puts the reference where it is needed. That combination can be a useful first setup for a room-wide border. The stand height and charging routine still need checking before the painting area is covered. If those fit the project, the continuous plane has a clear advantage over turning a short cross toward each wall, with the tape placement and final paint edge remaining separate parts of the decorating work.
To buy this product, click here.
Choosing the Best Laser Level for Painting Stripes
Choose the Intended Direction First
Level horizontal, plumb vertical, and deliberate diagonal layouts use different references. Use automatic leveling for gravity-based lines and a documented manual mode or careful manual tool setup for other angles. The method for transferring stripe boundaries to the actual wall keeps the intended stripe direction and tape boundary distinct.
Keep Tape Placement Consistent
A visible beam has width, while the intended paint boundary is an edge. Establish a consistent marking convention and apply the stripe dimensions from the design rather than guessing which side of the beam to follow.
Check the Wall Finish
Dark paint, gloss, and reflections can change the apparent line. Confirm the correct reference on the real surface. A reflected duplicate is not another usable baseline.
Choose a Suitable Attachment
Pins, adhesive, magnets, and stands create different contact and support requirements. Protect the finish and keep the tool outside the path of tape, coverings, and moving paint equipment.
Preserve Marks Between Sections
Turning or moving the instrument can change the reference. Keep appropriate control marks for the chosen height or angle and reconnect the setup before continuing around the room. Understanding when a local line differs from a full horizontal plane helps explain when re-aiming between sections requires the saved marks rather than an assumption about coverage.
FAQ
Can I Use a Laser for Diagonal Stripes?
Yes, with a documented manual-angle mode or a carefully established manual guide. The intended angle must be set independently of automatic level.
Does Every Pendulum Lock Create Manual Mode?
No. A transport lock is not automatically a supported operating mode. Follow the exact tool’s instructions.
Will the Laser Stop Paint Bleeding Under Tape?
No. It guides layout. Tape selection, application, and painting technique determine the edge finish.
Do I Need a Continuous Plane?
It helps with a common horizontal height across several walls. A local cross can be sufficient for a single-wall design.
Can I Turn the Tool and Keep the Same Angle?
Do not assume so. Reconnect the projection to preserved design marks after changing its position or orientation.
Final Verdict
The Fanttik D2 is our overall choice for a compact decorating tool with automatic and supported manual references. It suits a local design that moves between level, upright, and deliberately angled guides. The Motovera’s brightness settings serve a different practical need, while the GLL50-40G’s continuous horizontal plane has a clear advantage for a common stripe or border height across several walls.
The manual surface tools remain useful when their alignment and attachment routine fits the finish. Decide which direction the design needs, preserve appropriate marks, and use a consistent convention for the tape boundary. The beam makes the layout visible before painting, but it does not choose the angle or produce the paint edge by itself. A readable reference and a suitable support are what let that guide stay useful through the work.
